Installing your P-series device's wall mount? Follow these simple steps to get it up and running in no time. Here's your go-to guide:
📏 Step 1: Choose the Right Spot
- Find a cool, dry place near a power outlet.
- Ensure there are no obstructions like pipes, air ducts, electric wires, or drainage lines.
📐 Step 2: Measure Up
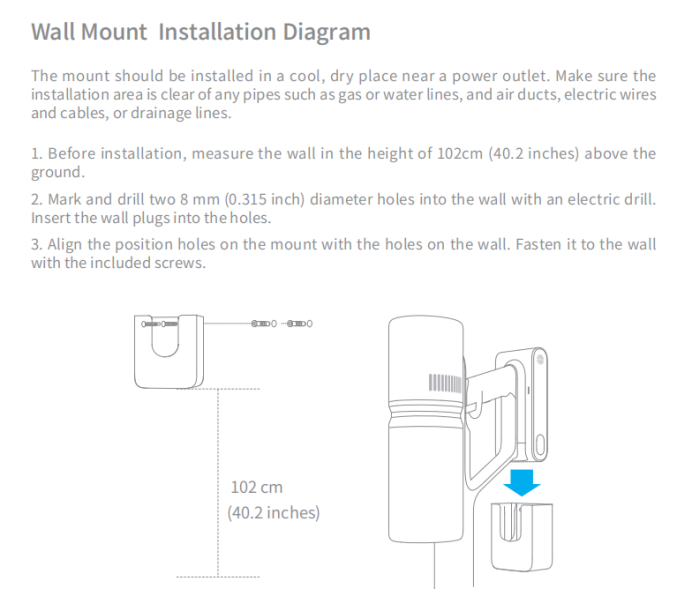
- Measure the wall at a height of 102 cm (40.2 inches) above the ground. This is where your mount will live.
🔩 Step 3: Mark and Drill
- Mark two spots on the wall for the holes.
- Drill two 8 mm (0.315 inch) diameter holes into the wall with an electric drill.
🔨 Step 4: Insert Wall Plugs
- Insert the wall plugs into the holes you drilled. These will help secure your mount to the wall.
🗜 Step 5: Align and Fasten
- Align the position holes on the mount with the holes on the wall.
- Fasten your mount to the wall using the included screws.
🔗 Step 6: Attach Your Device
- Once your mount is securely fastened to the wall, attach your P-series device.
📋 Note:
- Always follow the manufacturer's guidelines for your specific P-series model.
- If you're unsure about any step, consult with a professional.
🎉 Conclusion
That's it! Your wall mount is now ready to hold your device securely. This installation process ensures your device will be within easy reach while keeping the area neat and tidy. Enjoy the convenience of your wall-mounted P-series device!

Comments
0 comments
Please sign in to leave a comment.