Hey there, vacuum cleaner aficionado! 🧹 Are you ready to tackle the task of removing the cyclone assembly from your trusty V-Series Vacuum Cleaner? If you've got the right tools and a little patience, this process is a breeze! Let's get started.
Step 1: Gather Your Tools
Before you begin, make sure you have the 2-in-1 brush nozzle handy. This handy tool is your secret
weapon for this disassembly task.
Step 2: Unlock the Cyclone Assembly
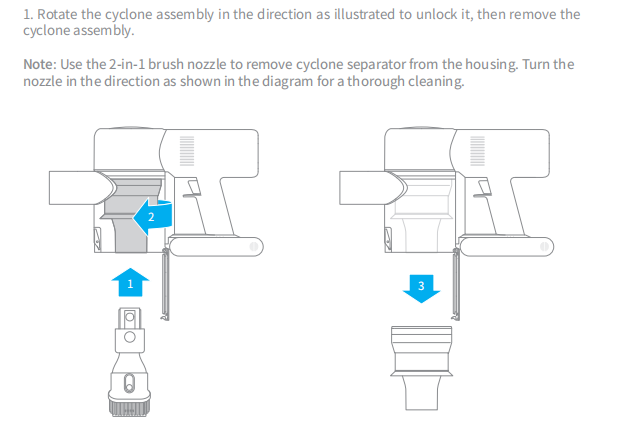
First things first, you'll need to rotate the cyclone assembly in the direction shown in your picture. 🔄 This will unlock it, and you'll be able to remove it easily.
Step 3: Remove the Cyclone Assembly
Once it's unlocked, gently but firmly remove the cyclone assembly from the vacuum cleaner housing. Easy peasy! 🏠→🌀
Step 4: Clean the Cyclone Separator
Now, for a thorough cleaning, it's time to use your 2-in-1 brush nozzle. Turn it in the direction indicated in the diagram (probably counterclockwise, but check your manual to be sure). 🔧
Step 5: Reassemble
After you've given it a good clean, simply reverse the process to put everything back together. Make sure everything is locked in place and secure before you start vacuuming again.
Tips for Success:
- Take Your Time: Rushing can lead to mistakes or damage. Slow and steady wins the race here.
- Check the Manual: If you're unsure about any step, refer to your vacuum cleaner's manual for specific instructions.
- Keep Your Tools Handy: Having your 2-in-1 brush nozzle ready will make the cleaning process much smoother.
And there you have it! You're now a pro at removing and cleaning the cyclone assembly of your V-Series Vacuum Cleaner. 🎉 Give yourself a pat on the back, and happy cleaning! 🌟
Remember, if you ever feel unsure or encounter any issues, don't hesitate to reach out to customer support. They're there to help! 👋

Comments
0 comments
Please sign in to leave a comment.