Hello there, T-Series_tidy-tamer! 🧹💨 Ready to give your trusty vacuum a little TLC? Let's dive into the fun and straightforward process of removing the cyclone assembly. No need to be a tech wizard—just follow these simple steps!
Step 1: Unmask the Pre-Filter
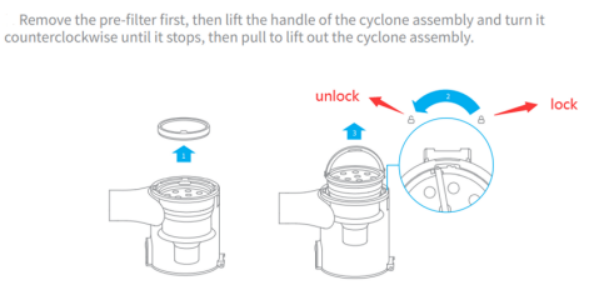
- First things first, let's get that pre-filter out of the way. It's like taking off a cape to reveal the superhero inside!
Step 2: Unleash the Cyclone
- Now, it's time to meet the cyclone assembly. Locate the handle and give it a gentle lift. You're almost there!
Step 3: The Counterclockwise Twist
- Here comes the twist! Turn the handle counterclockwise, just like when you're unscrewing a jar lid. Keep going until you feel it stop.
Step 4: Lift and Out
- With the handle turned, it's time to lift and pull the cyclone assembly out. It should come out smoothly, like a magician pulling a rabbit out of a hat.
Step 5: Lock and Secure
- Once you've got your cyclone assembly out, make sure it's locked and secure. You don't want it to go wandering off during your cleaning session!
And there you have it! You've successfully removed the cyclone assembly from your T-Series vacuum. High-five to you! 🙌 Now your vacuum is ready for its next cleaning adventure. Remember, a well-maintained vacuum is a happy vacuum!
💡 Pro Tip:
- If you ever feel like you're stuck, don't hesitate to reach out to our support team. We're here to help you every step of the way!
Happy cleaning, and may the force of cleanliness be with you! 🌟🧹

Comments
0 comments
Please sign in to leave a comment.